summer frock – tutorial + pattern

I’ve had a quite a few requests for this tutorial. I hope you use it + enjoy it. This dress is made to have neither a front nor a back. It is also made to go over the head, one arm at a time. Lets get started.
Buy the pattern piece right here in my shop.
Print pattern.
Buy the pattern piece right here in my shop.
Print pattern.

Supplies needed:
-skirt fabric
-bodice fabric
-bodice lining fabric
-fishing wire
-scissors
-skirt fabric
-bodice fabric
-bodice lining fabric
-fishing wire
-scissors

Start by cutting 2 bodice pieces + 2 bodice lining pieces.
 Stitch the neckline of the bodice.
 Then stitch the armholes about 1/2 way up.
 Turn each piece.
Press the neckline flat.
 Then press the armhole flat.
 Including the length of the armhole that is not stitched.
 Your two bodice pieces should now look like this.
 Lay your two pieces, right sides together.
 Take the top edge of each bodice + pin flush.
 Like so.
 Now using a 1/4 inch seam, stitch the two pieces together, on both sides.
 This will leave you with a small hole that we will deal with in just a bit.
 Time to stitch the sides.
 Again put right sides together.
 Pull up the lining on each side + pin.
 Using a 1/4 inch seam, stitch your sides.
 Be sure to only get the sides of the bodice when you sew, nothing else.
 Time to iron the armholes. Push the fabric back into the hole, following your original pressed lines.
 And iron flat.
 Press your seams flat on the sides,
 Turn down + press the sides.
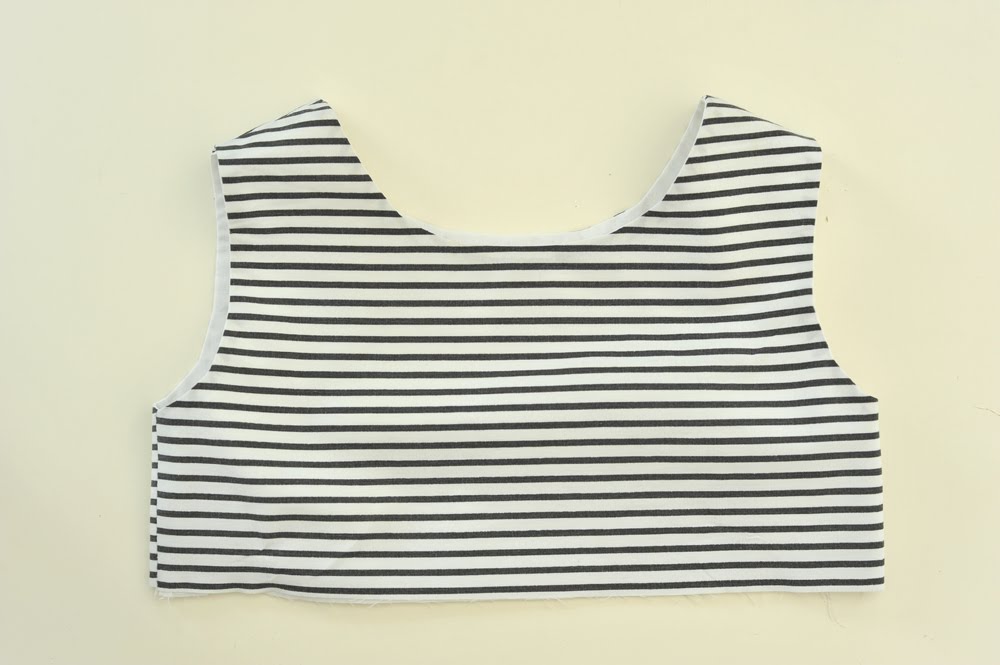 Your bodice should now look like this.
 Everything should be pressed nice + flat.
 Top-stitch the neckline using an 1/8 inch stitch.
 Nice + close to the edge.
 Now top-stitch the armholes, again using an 1/8 inch stitch.
You just made a bodice + a fine one, I’m sure.
 Now make the skirt. For the length, I measured from right underneath the breast bone to the knee. I also used the edge of a pillowcase for skirt, so finishing the hem was unnecessary. You can follow the directions on the elastic waist tutorial for finishing an hem.
 Additionally, I used a french seam on the skirt, tutorial for french seam here.
 To create the gathers in the waist I used the fishing wire technique. Using a zigzag stitch,
 stitch the fishing wire to the top of the skirt.
 Like so.
Now time for assembly.

Start with your skirt piece + bodice piece RIGHT side out. Pull up the bottom part of the bodice.

Then turn the bodice inside out.

Then upside down.
 Slide your bodice piece into your skirt piece.
 Pin bodice to skirt.
 Make sure to have about equal lengths of fabric between each pin. Then pull your fishing wire loose ends tight to gather the skirt.
 Using an 1/2 inch seam, stitch along the top edge.
You should have something similar to this.

Now, pull the the bodice up out of the skirt.

Lay bodice flat.
 See how your raw edge is completely enclosed within the bodice? Perfect!
 Turn the dress inside out + press your back seam, making sure the raw edge is going up into the bodice.
 Then turn your dress right side out + turn the outside edge of your bodice under about 1/4 inch.
 Press flat.
 Using 1/8 inch, stitch the top bodice to the skirt
Now go forth + enjoy summer.
I would really like to purchase this pattern, can you please tell me how I can do that. None of the links seem to be working. Thank you
ReplyDelete