A very kind woman at a locally owned fabric shop showed me this and I am so grateful! She had a reference sheet, "Bias Tube Construction" from Lamb Art Press, Inc of Parsons, Tennessee. I can't find them online but I did find something just like her xeroxed sheet on eBay! And another identical reference here. So here we go. If you'd like to learn to make bias tape binding the tubular way (it is totally tubular and there is some geometry thrown in--the last math subject I remember loving!) then keep reading. This method has you start with a square, cut and sew two longer seams and then cut in a spiral and voila! You've got yards of bias tape!
BIAS TUBE TAPE BINDING TUTORIAL
Materials to make 2" wide bias tape binding ~128" long (enough to bind a 45" square Chenille Blanket or Chevron Chenille Blanket). If you want to make a different width or length check this yardage table as a reference, which also includes a sketched tutorial which is similar, but different then the method I outline here (my drawn cutting lines are the biggest difference). Check it out because one or the other may make better sense to you.
MATERIALS:
MATERIALS:
- 2 12" squares of your chosen cotton fabric
- ruler
- fabric pen or pencil for marking cutting lines
- scissors and/or rotary cutter
First you will need to cut 2 12" squares of your fabric. (Note that I am using 2 12" squares because I had that width remaining from a 60" wide fabric after cutting out my blanket--convenient. You could also do this with a 17.5" square if you have that width and only cut one.)
Cut your square on the diagonal into two equal isosceles right triangles (90-degree angle triangles). The cut just formed thehypotenuse, or longest side of each right triangle.
Flip the bottom triangle over and align the former bottom edge with the top edge of the other triangle right sides together. Pin.
Stitch along this edge using a .25" seam allowance.
Press the seam open and you will have a parallelogram looking shape like this. Repeat these last steps with your other square (cut into two triangles, stitch right sides together as illustrated above).
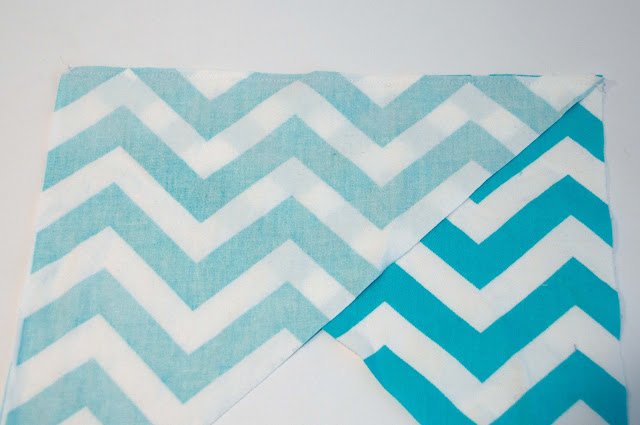
Now you will lay the two parallelogram shapes right sides together matching two of the short sides of your right triangles (not the hypotenuses) as pictured above. Pin and stitch using a .25" seam allowance. (If you are using just one, larger square you would skip this step.)
Press seam open and you will have a long parallelogram looking like this above. (Or a much shorter one if you are using one square.)
Now you will mark your cutting lines. Mark these by making lines 2" apart running parallel to the long edges of your parallelogram so they are on the bias.
The lines should cross your seams at an angle. You can use a fabric pen or a regular pencil. I used a regular ballpoint pin and did all my marking on the reverse since any remaining marks won't show once the binding is folded and stitched in place.
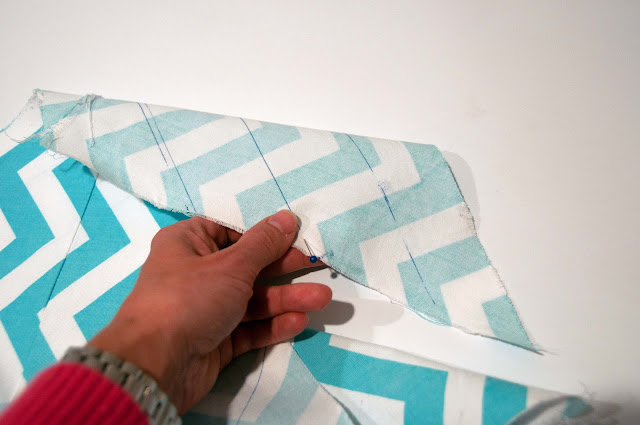
Now comes the tricky part! Place a straight pin on your FIRST cutting line (from the right) .25" down from the raw edge on one of the short ends of your parallelogram.
Loop your parallelogram and bring the short raw edges right sides together.
Locate the cutting lines on the other end. Stick a straight pin .25" down from the raw edge on the SECOND cutting line from the right.
Bring together the straight pins and pin the fabric together so you are matching the FIRST and the SECOND cutting lines.
This creates an offset like the photo above.
So you will have part of the short edges protruding on either edge. Pin along these short edges.
Stitch using a .25" seam allowance and press open. Your looped parallelogram will now look like this--mismatched a bit but the cutting lines meet. This is the beauty of this method! Because...
Now you simply start cutting along the cutting lines at one of the protruding edges and the magic happens!
Cut, cut, cut, cut...
...and you end up with ONE LONG STRIP of bias seam binding. Yeah! So great. Isn't that more interesting than the traditional method?
Now to make this double fold, fold in half lengthwise and press.
Then bring the long raw edges to the center fold (you can make one of these second folds a bit more shallow than the other if you want--as they do in the packaged variety, or bring both into the middle so the raw edges touch).
And press.
There you have it! One hundred twenty eight inches of beautiful bias tape binding, double-fold. Ready for your project.
(Chevron Chenille Blanket with Tubular Bias Tape Binding)


No comments:
Post a Comment