Sunday, July 15, 2012

[GUIDE] HOW TO THREAD A SEWING MACHINE {STEP-BY-STEP}


HOW TO THREAD A SEWING MACHINE {STEP-BY-STEP}

Learning how to thread a sewing machine is vital when trying to sew any item properly.  Therefore it’s the first topic on our new How To Sew series here on Tip Junkie.  {squeal!}  The fabulous seamstress Andrea is here to show us step-by-step with pictured instructions on the best way for threading a sewing machine.
Welcome to the first of three posts in a mini series, “How To Sew” that will help give you the confidence you need to get your machine threaded, pick the right needle and thread & then get sewing!!

How To Thread A Sewing Machine

all crafts How To Thread A Sewing Machine {step by step}
{Photo Credit}
The BEST help for threading a sewing machine is the machine itself AND the machine’s manual.  Unfortunately, a lot of well loved {used} machines don’t come with a manual and sometimes {er, this NEVER happens} we misplace the manual that did come with our machine. Thankfully, most machines give you a step-by-step guide right on their body.
all crafts How To Thread A Sewing Machine {step by step}
In order to sew, you need two sewing threads. An upper thread {the stitches you see on the top of your piece} and a bobbin {the stitches on the underside of your piece}. In order to wind a bobbin, your machine can not be already threaded and ready to sew {as you need it to go onto the bobbin}. That is why we will cover this step first.
** There are a few machines {like mine} that will wind the bobbin independent of the upper thread, but this is not as common. **

How To Thread A Bobbin

Typically the bobbin threader {winder} is on the top right of the machine and there is a second set of marked guides {usually a dashed line} on the machine to show you how to wind your bobbin. On my machine, then it goes from the spool, through the eyelet and then around a bobbin winding tension disk and over to the bobbin winder. I guide the thread from the underside of the bobbin to the top through the small hole on the outside edge of the bobbin.
all crafts How To Thread A Sewing Machine {step by step}
Place the bobbin on the bobbin winder spindle, click to the right to engage the bobbin winding and then push the bobbin winding button.  Clip off the little tail from where you first wound the bobbin once it is wound. Cut the thread feeding from the spool and remove the bobbin from the winding pin.

Step By Step

all crafts How To Thread A Sewing Machine {step by step}
Drop your bobbin into the bobbin holder {the mechanism under the needle} and thread according to the guide. Your bobbin should unwind in a counter clockwise direction.

Threading A Sewing Machine

My machine is set up to accommodate two spools of thread, so my top thread {the one that creates the stitches on top of your project) sits upright at the back of my machine. A lot of machines have a horizontal spool pin that the thread goes onto on the top of the machine.
all crafts How To Thread A Sewing Machine {step by step}
Place your thread {mine is hot pink … because it’s fun and easier for you to see in pictures} on the spool pin. You should be able to ‘lock’ your spool in place by placing a plastic spool holder in front of it to keep it from sliding off the pin while you sew.
all crafts How To Thread A Sewing Machine {step by step}
Follow the guide on your machine {referring to the manual as needed, if applicable}. Typically you’ll feed your thread through an eyelet {2 on my machine} and then click it into a thread guide {3 on my machine}. From there it will feed to the tension area on the left of your machine.
all crafts How To Thread A Sewing Machine {step by step}
It should guide into a ‘slot’ {4} and then go down {around the tension dial – 5} and then back up to the thread take up arm {6} that rises up and down when you sew. Use your manual feed, handwheel {the large round knob on the far right end of your machine} to guide the arm to the top most position so you can guide your thread through it.
** I think this is the trickiest step of loading your machine. I always make this step harder than it has to be. If you look close, there should be a little ‘notch’ to guide your thread into the eye of the arm. **
all crafts How To Thread A Sewing Machine {step by step}
Then follow the remaining guides to get the thread down to your needle. I have an automatic threader which is handy, but with good light and a steady hand you can thread it manually just fine. I thread from the front of the needle to back.
all crafts How To Thread A Sewing Machine {step by step}
Once your top thread is in place, use your hand-wheel to lower your needle down and then back up. This should ‘grab’ your bobbin thread and bring it up with the top thread. You should have two pieces of thread now. Give them a light pull so you have about 3-5 inches of thread.
Congratulations!! You’re ready to start sewing!!
If you’re looking for a tutorial for your specific machine, YouTube has a several great videos on how to thread your sewing machine and you can Google resources like downloadable manuals for old {and new} sewing machines.
I hope this post gave you the little push you needed to: pull out that machine you’ve been holding onto, ask to borrow one from a friend OR purchase one to work on growing your sewing skills.

Free Sewing Patterns:

all crafts How To Thread A Sewing Machine {step by step}
Click for Photo Credit
In my next post, I’ll cover the different types of threads & needles available and tell you why it DOES make a difference which ones you use {and why}.
I’m Andrea of Knitty Bitties … my little shop that fills my heart as I sew my days away in a wonderful room creating little bits of happy for you. You can read more about my days, my love of iced tea, running, baking & my newest love, our puppy, Daisy girl.

[GUIDE] HOW TO USE A SEWING MACHINE {FABRIC MUG RUG}


HOW TO USE A SEWING MACHINE {FABRIC MUG RUG}


Learning how to sew can be an intimidating task but Andrea is here with pictured instructions and easy step-by-step instructions on how to use a sewing machine by making this easy fabric mug rug.
To quickly recap our How to Sew series, we’ve learned how to thread our machine and we’ve picked out the right needle and thread.  Next up, how to use a sewing machine so… let’s sew!!
**First, come close … let me tell you a little secret. Want to know the way to get good at sewing? It’s practice, practice, practice. Practice makes perfect. It’s true it does.**
Put in your Universal needle and All Purpose thread (this is what I use 90% of the time) and thread your sewing machine.

How To Use A Sewing Machine

all crafts How To Use A Sewing Machine  {fabric mug rug}
A little prep work before we push the pedal and sew:
1. Adjust your stitch length. I typically sew seams (not top-stitching or decorative stitching, but the stitching that holds two pieces of fabric together) with a stitch length of 2.2-2.5 {the middle numbers on the top row of my digital screen}. When I top-stitch or quilt, I increase the length to about 3.
all crafts How To Use A Sewing Machine  {fabric mug rug}
2. Adjust your top thread tension using the tension regulating dial on your machine. Every machine {and every project} is going to be a little different. Mine recommends a tension of 2-6. I usually keep it around 5. You may need to adjust this as you start to sew to make sure your stitches look nice and tight, not loose {and you don’t see your bottom thread on the top of your work}.
3. Determine your seam allowance (SA). 1/4″ SA is pretty standard, but starting out, it may be easier for you to start with a 3/8″ – 1/2″ SA.
all crafts How To Use A Sewing Machine  {fabric mug rug}
4. Grab your fabric and pin it. I recommend grabbing some fabric scraps or using some old linens to practice your straight stitching. I pulled out 4 pieces from my scrap box to demonstrate. Put two pieces right sides together and line up the right side. I don’t normally pin much any more, but I did a lot in the beginning. You can pin at an angle to the side or parallel to the side. Whatever you do, DO NOT sew over your pins. It is bad for your needle and your machine. Your needle can push the pin down into the under carriage of the machine and it can get caught in the mechanisms. {Trust me, I speak from experience.}
If you pin far enough from the side, you can keep your pins in as you sew. Otherwise, make sure to stop and remove the pin before your needle gets to it.

How To Sew

all crafts How To Use A Sewing Machine  {fabric mug rug}
Okay, let’s sew!
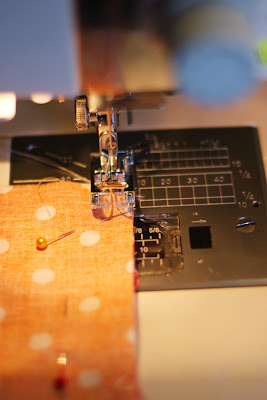
1. Line up the right side of your two pieces {pinned or held together} with the guide line for your SA. Typically if you line up your work with the edge of your presser foot, it will give you a 1/4″ SA. My machine has guidelines on both the plastic bobbin cover plate and the metal needle plate.
all crafts How To Use A Sewing Machine  {fabric mug rug}
2. Lift your foot {using the presser foot lifter} and place the fabric underneath, lining it up with the edge of the foot or the correct SA guide line. Lower foot to hold fabric.
all crafts How To Use A Sewing Machine  {fabric mug rug}
3. Slowly begin to press the pedal and sew a few stitches {about an inch}. I almost always secure my beginning and ending stitches by doing a few ‘back stitches.’ You back stitch by holding down a reverse button or lever that, go figure, reverses the direction of your stitching. Typically you have to hold this button/lever down while pressing the pedal. Back stitch just shy of the beginning and then let up on the button/lever and continue stitching in a forward direction.
all crafts How To Use A Sewing Machine  {fabric mug rug}
4. Continue sewing to the end of your two pieces. Back stitch a few stitches and then sew to the end of your work. Depending upon your machine settings, your needle might end in a ‘needle up’ {needle not in the fabric} or a ‘needle down’ {needle in the fabric} position. If it is in the needle down position, turn the hand wheel to bring it into the needle up position. Lift foot and remove your piece. You should have two strings attached, the upper thread and the bobbin thread. Clip them both, leaving a 4-6 inch tail of thread on the machine. You ALWAYS want to start a new seam with a tail of at least 4 inches. Otherwise your top thread gets taken back up and un-threads your needle. You will then be frustrated {again experience talking here}.
5. Repeat steps 1-4 with remaining scraps, continuing to place them right sides together and sew the right side.
all crafts How To Use A Sewing Machine  {fabric mug rug}
Tada!! You just sewed yourself a scrappy-patchwork piece. Which with a little bit of seam pressing, trimming, straight line quilting and binding …
all crafts How To Use A Sewing Machine  {fabric mug rug}
To turn it into this cheerful mug rug follow the step-by-step instructions over on my blog.
I know, I know that is a lot of additional steps, but it is all done with straight lines. Straight lines are the great starting point for getting good and comfortable with your machine and sewing.
Now practice, practice, practice because in late June, we’ve got ourselves a date to make a simple quilt where you can really turn your straight line stitching into a beautiful keepsake. Plus … you can win the fabric to make your quilt too!

How To Sew Series:

Step 1:  How To Thread A Sewing Machine {step-by-step}
Step 2:  The Needle and Thread Guide {all you need to know}
Next Thursday:  How to sew!

Free Sewing Patterns:

If you have any questions about learning to sew, free to leave your question in the comments or on the Tip Junkie Facebook page. Or if you’re looking for a specific pattern, let me know! I’ll be happy to find it for you.
I’m Andrea of Knitty Bitties … my little shop that fills my heart as I sew my days away in a wonderful room creating little bits of happy for you. Come visit my blog for lots of creative inspiration, free tutorials and snippets of my everyday life.

[GUIDE] THE NEEDLE AND THREAD GUIDE {ALL YOU NEED TO KNOW}


THE NEEDLE AND THREAD GUIDE {ALL YOU NEED TO KNOW}

We are continuing our How to Sew series thanks to Andreawith the needle and thread guide and everything you need to know about the types of needles and thread and what’s important so that your sewing projects turn out beautiful.  It may not be the most exciting topic, but knowing the basics is very important and you’ll be grateful for this quick refresher course on sewing thread 101.
* While you’re here be sure to enter to win a Bias Tape Maker with 4 additional tips from Simplicity, a $140.00 value! {squeal}
Okay, so I’m just going to say it right off since I know some of you are thinking it … Needle? Thread? What’s the big deal. Just put a needle in your machine and thread it with the color of your choice, right?
Wrong.
Your needle matters. A lot. Your thread matters … not as much as your needle, but it matters.
Of all the ‘stuff’ you need to sew, needles and thread are two of the cheapest. But DON’T be cheap when you buy them okay? If you are going to take the time to sew something and you are going to use good fabric (which again, there is a difference between ‘designer’ fabric and big box hobby shop fabric) treat yourself {and your machine} to good needles and thread.

Needle and Thread

all crafts The Needle and Thread Guide {all you need to know}

About Needles

Use the right needle for the right job. The best way to know which needle is {again} to refer to your sewing machine manual for their recommendations. The next best thing, read what your pattern suggests for a needle. If neither of those is an option for you, read the needle package.
all crafts The Needle and Thread Guide {all you need to know}

Types Of Needles

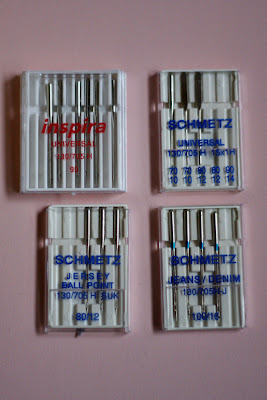
Here are the needles I have on hand and use on a regular basis {top row – Universal Needles / bottom left – Ball Point Needles / bottom right – Jeans/Denim Needles}
Universal Needle – this is your basic sewing needle used for sewing cotton fabrics. I use a universal needle 90% of the time. They come in different sizes. I sew with a 90/14.  **I This is also the needle I use when quilting. However, quilting is not my main type of sewing so you may find using a specific quilting needle to work better for you.**
Ball Point Needle - this needle is used for sewing knit fabrics.
Jeans/Denim Needle - Just as the name indicated, this needle is used for sewing through thick material like jeans/denim. I also use my denim needle when I’m sewing through multiple layers of fabric (say 4 or more layers).

Care of Needles

It is recommended that you put replace your needle after every project. Honestly? Well, that’s just not realistic for me. But because I do sew A LOT, I’ve tried to get in the habit of putting in a new needle every Monday morning. If you don’t sew that often, maybe change it once a month or once every other month. A fresh needle helps your bobbin and top thread work together and keep your stitches looking good.

Where To Buy Needles

You can buy needles at most sewing/hobby/craft stores for a few dollars a package. You can also purchase them from specialty sewing shops (they may recommend a specific brand for your machine) or online (sewingmachinesplus.com has a great selection).
all crafts The Needle and Thread Guide {all you need to know}

About Sewing Machine Thread

Just like with needles, you should use the thread recommended for the material/project you are working on.

Types of Sewing Thread

Just like needles, there are threads designed for different materials.  Here are the ones I keep on hand for using on a regular basis.
All Purpose – this is your basic everyday 100% Polyester. I use this type almost exclusively.
Denim – this is a really thick cotton {gold} that is perfect for hemming jeans to match the same look that was used on the original jeans.
Speciality – this is ‘decorative’ thread that is often used in quilting to create a shimmer or added dimension to your quilting.
Quilting - usually a thicker 100% cotton used for quilting.  **I’ve actually found that this thread can be more hassle than it’s worth. I just stick with my regular cotton thread.**
all crafts The Needle and Thread Guide {all you need to know}

How Much Thread?

I go through A LOT of thread and have found that for my everyday sewing, my favorite brand is Gutermann. I like to buy their larger spool {in natural} which has over 1000yds. My machine can accommodate this larger spool with it’s vertical spool pin. However, you can also purchase something like this,Cone Thread Stand,which allows you to buy serger sized spools for even less frequent changing.
I don’t use color that often, so I typically buy a smaller spool (around 250-500yds) which will last me through several projects.
all crafts The Needle and Thread Guide {all you need to know}

How Many Colors Of Thread

As you know it comes in hundreds of colors. I use a natural color {blends better than a bright white} for most of my sewing. If I’m top-stitching (the stitching around the edge of a project that will be seen) and I think the natural will be too much of a contrast, than I switch to a coordinating color of thread. I have the basic rainbow of colors and then buy any additional colors as needed for projects.  You don’t need all one hundred colors. You’d be surprised how little you notice a slight variance in color shade on a finished project.

Where To Buy Thread?

Surprisingly this is one thing I recommend buying at that big box hobby store. They often have great sales and usually carry reputable brands such as Coats&Clark, Gutermann & Sulky.
I do not recommend buying the cheap, cheap, cheap ‘store brand’. It will break on you, cause tension issues and/or bobbin jams … all of which will want to make you throw in the towel on sewing. Spend a little more for big impact.
Grab a new needle, some good thread and get your machine threaded so you’ll be ready for next week when we go over … How to Sew.

How To Sew Series:

Step 1:  How To Thread A Sewing Machine {step-by-step}
Step 2:  The Needle and Thread Guide {all you need to know}
Next Thursday:  How to sew!

Free Sewing Patterns:

If you have any questions about learning to sew, free to leave your question in the comments or on the Tip Junkie Facebook page. Or if you’re looking for a specific pattern, let me know! I’ll be happy to find it for you.
I’m Andrea of Knitty Bitties … my little shop that fills my heart as I sew my days away in a wonderful room creating little bits of happy for you. Come visit my blog this week for lots of creative inspiration {from 7 lovely bloggers} with my “Spring Board Creative Collaboration” event.

[GUIDE ] SEWING MACHINES ~ A BUYING GUIDE


SEWING MACHINES ~ A BUYING GUIDE


Have you been wondering what is the best sewing machine to buy?  I know that I have!  I am excited to introduce Ruthanne, who is sharing her sewing machine buying guide and tips on how to buy the best sewing machine for your needs and budget.
This time about twelve years ago, I walked into my nearest SEARS department store, randomly picked out one of the most expensive sewing machine they carried, brought it home and promptly felt overwhelmed. To this day, out of the 18 different stitches my sewing machine can do, I’ve only ever used three of them. Only three.
As much as I love my machine, and I do love my machine, it’s much more than I ever should have purchased.

How to Find The Best Sewing Machine for You

My desire is to share with you some simple tips on buying a sewing machine that will save you both money and frustration. I’m not to going to focus on brands of sewing machines, rather on general principles. I think if you get a good machine and take care of it, it will take care of you ~ regardless of its brand. Of course, I may be alone in that.  {wink}
Let’s get started.

1. What’s your budget?

I realize budgets are never fun to talk about. Or is that just me?
Fun or not, having a set amount and/or limit in mind before venturing into the market for a new sewing machine will save you time and . . . . wait for it . . . money! Knowing your limit will narrow down the playing field. You won’t waste time looking at machines that far exceed your budget. You also won’t be disappointed once you get your heart set on one only to learn you can’t afford it.

2. What is your skill level?

Are you just starting out? Do you sew off and on, but nothing serious? Are you an avid seamstress {If you are, then you should probably be writing this and not me! ::wink::}? Be sure to factor in your skill level when shopping for a sewing machine.
Don’t do what I did. I bought a beast. A beast I can still barely handle over a decade later.
It’s okay to start out basic and work your way up. Upgrading your machine after you’ve mastered all it can do is wise.

3. Plan For The Future

This might sound contradictory to my previous statement, but there are times when it’s appropriate to buy a machine that will grow with you. Are you a fast learner? Do you have big plans? Maybe one day you would like to open up your own handmade business. That’s fantastic! Investing in a more substantial machine, both financially and with more features, is an investment in your future. It will payoff.
I wouldn’t recommend doing this if your main objective is to sew things mainly for your home and family. A basic machine with fewer bells and whistles will get the job done. You’ll be able to buy more fabric to create more projects with all the money you saved by not investing in the bells and whistles. Trust me when I tell you, fabric shopping is half the fun of sewing.

4. Check Out Other Venues

If you’re open to purchasing a slightly used machine, you can look beyond your local SEARS or JoAnn Fabrics. Check on Craigslist, ebay or in your local paper for used machines. I’ve found all kinds of goodies through these outlets. You’ll want to use caution and get as much information as possible before making the purchase. Make sure the owner still has the original owner’s manual. You will definitely need it!
If using Craigslist, make sure you bring another person with you when meeting up for the exchange.

5. Learn From A Loaner

Does your grandmother have a machine she no longer uses? How about your mom? Before taking the leap into the market, consider borrowing a sewing machine for a season while you are learning the ropes. It’s an excellent way to figure out what you’re comfortable with. It will also tell you what features you would like to have and the ones you can live without.
What about you? What tips have worked for you when buying a sewing machine?
If you have any questions about how to pick the best sewing machine for you, free to leave your question in the comments or on the Tip Junkie Facebook page.


summer frock – tutorial + pattern


summer frock – tutorial + pattern


I’ve had a quite a few requests for this tutorial. I hope you use it + enjoy it.  This dress is made to have neither a front nor a back. It is also made to go over the head, one arm at a time. Lets get started.


Buy the pattern piece right here in my shop.
Print pattern.
Supplies needed:
-skirt fabric
-bodice fabric
-bodice lining fabric
-fishing wire
-scissors

Start by cutting 2 bodice pieces + 2 bodice lining pieces.
Stitch the neckline of the bodice.
Then stitch the armholes about 1/2 way up.
Turn each piece.
Press the neckline flat.
Then press the armhole flat.
Including the length of the armhole that is not stitched.
Your two bodice pieces should now look like this.
Lay your two pieces, right sides together.
Take the top edge of each bodice + pin flush.
Like so.
Now using a 1/4 inch seam, stitch the two pieces together, on both sides.
This will leave you with a small hole that we will deal with in just a bit.
Time to stitch the sides.
Again put right sides together.
Pull up the lining on each side + pin.
Using a 1/4 inch seam, stitch your sides.
Be sure to only get the sides of the bodice when you sew, nothing else.
Time to iron the armholes. Push the fabric back into the hole, following your original pressed lines.
And iron flat.
Press your seams flat on the sides,
Turn down + press the sides.
Your bodice should now look like this.
Everything should be pressed nice + flat.
Top-stitch the neckline using an 1/8 inch stitch.
Nice + close to the edge.
Now top-stitch the armholes, again using an 1/8 inch stitch.
You just made a bodice + a fine one, I’m sure.
Now make the skirt.  For the length, I measured from right underneath the breast bone to the knee.  I also used the edge of a pillowcase for skirt, so finishing the hem was unnecessary. You can follow the directions on the elastic waist tutorial for finishing an hem.
Additionally, I used a french seam on the skirt, tutorial for french seam here.
To create the gathers in the waist I used the fishing wire technique.  Using a zigzag stitch,
stitch the fishing wire to the top of the skirt.
Like so.
Now time for assembly.  
Start with your skirt piece + bodice piece RIGHT side out. Pull up the bottom part of the bodice.
Then turn the bodice inside out.
Then upside down.
Slide your bodice piece into your skirt piece.
Pin bodice to skirt.
Make sure to have about equal lengths of fabric between each pin. Then pull your fishing wire loose ends tight to gather the skirt.
Using an 1/2 inch seam, stitch along the top edge.
You should have something similar to this.
Now, pull the the bodice up out of the skirt.
Lay bodice flat.
See how your raw edge is completely enclosed within the bodice? Perfect!
Turn the dress inside out + press your back seam, making sure the raw edge is going up into the bodice.
Then turn your dress right side out + turn the outside edge of your bodice under about 1/4 inch.
Press flat.
Using 1/8 inch, stitch the top bodice to the skirt
Now go forth + enjoy summer.